You don’t need to be a mastering engineer to learn how to master a song. In this video, from iZotope, discover how easy it is to take a track from first to final master with the intelligent tools available in Ozone 9 including the improved Tonal Balance Control, Master Rebalance, Low End Focus, and more.
Prep your track
The first thing I did was import my track, “Might Be Right” by White Reaper, and placed Ozone 9 and Tonal Balance Control on the master bus.
Tonal Balance Control
Tonal Balance Control is a metering tool that shows you the health of your tonal balance—the distribution of energy from low to high-frequency content.
Tonal Balance Control also allows you to see how your track stacks up against reference targets iZotope created after analyzing thousands of amazing masters. You can upload your own favourite tracks, or whole groups of tracks, to match against custom targets from your favourite references.
Talk To Other iZotope Plug-ins
If you notice a little or a lot of energy in the lows, low mids, high mids or highs, you can address it by remotely controlling the EQ in Ozone and output gain with inter-plugin communication. You can also remote control Nectar, Neutron, and Relay.
Master Assistant
Getting started mastering your project can be daunting—do you EQ first? Or do you start compressing? What is the ideal mastering signal chain? What special processing do you need before uploading your track to a streaming service? To help give you a push in a helpful direction, we created Master Assistant. Through Machine Learning, Master Assistant is designed to give you a starting point that’s intelligently tailored to your music to help you create a professional sounding master regardless of your experience level.
Setup
Click on the Master Assistant button and choose from the settings which Vibe, Loudness, and Delivery options you’re going for. Vintage mode is a new option in Ozone that deploys the Vintage Compressor, Vintage EQ, and Vintage Limiter to give your track a warm, gritty sound.
Choose Your Loudness
There are three loudness options resulting in different integrated loudness targets. If I choose low, it’ll aim to make the overall level of the master -14 LUFS. At medium, -12 LUFS, and at high, -11 LUFS.
Choose Your Destination
Choosing streaming will ensure the threshold ceiling on the Maximizer will be -1 dB, which will protect your track from jumps in gain. If you choose CD, it will set the threshold ceiling to -0.3 dB.
Run The Module
Choose a particularly energetic portion of your track and press Next to get the process started. No need to wonder what Master Assistant is doing, it tells you exactly what processing it is applying as it does so. When the module is finished running, you can either Accept or Cancel the changes.
Tweak The Result
Master Assistant provides you with a great starting point. With basic EQ, Dynamics, and Maximizer settings in place, we can take the time to make the master our own by tweaking these modules or adding new ones.
Master Rebalance
Maybe after applying basic loudness and EQ settings with Master Assistant, you notice your drums are a little quiet next to the rest of the mix. If you had the mix session open, you could easily reach for the drum channel and turn up the kit. But with only a stereo track, your options are limited. Luckily, with Master Rebalance, you can reach into the stereo mix and boost the kit with one fader, without needing the individual drum tracks.
Setup
Open up Master Rebalance, and place it prior to any other processing. This allows later upstream processing to affect it, simulating a mix that had healthy drum levels all along. While you can place Master Rebalance anywhere in your chain, we recommend placing it at least in front of the Maximizer to protect against clipping or distortion.
From here, it’s as easy as boosting the drum gain until you’re happy with the level. You might notice how the kick comes up, but the bass guitar doesn’t. The machine learning technology powering this module ensures clean identification and separation of those track elements, so only the source that you want will be boosted.

Master Rebalance in Ozone 9 Advanced
Low End Focus
Low end signal can be complex. When lots of instruments are in this space, the overall tone of your low end can become blurry and unfocused. Let’s add articulation and clarity to the overall low end with a new module in Ozone, Low End Focus.
Low End Focus helps draw attention to prominent frequencies around 20–300 Hz. Adjust the slider up and you’ll increase the contrast between prominent and less prominent frequencies, down and you’ll decrease this contrast.
A good rule of thumb is to place Low End Focus before multiband compressors—also called the Dynamics module in Ozone. This ensures that the module’s processing will be properly ‘framed’ and controlled for via the compressor and Dynamic EQ modules ahead of it.
Punchy And Smooth Modes
There are two modes in Low-End Focus, Punchy and Smooth. Use Punchy if you’re aiming for an aggressive and exaggerated low end. Use Smooth for a more subtle and rich sharpening of your low end.

Low End Focus in Ozone 9
Ozone Imager
The final step is adjusting the stereo width with Ozone Imager. Ozone’s Imager module allows you to adjust the stereo width of your mix, using multiband stereo imaging. Stereo imaging, when applied with a light touch, can help your master breathe and give it an impactful, wide panoramic quality.
Imager offers a new mode in Ozone 9, Mode II. This is an alternative to the classic Stereoize mode that imparts a slightly different tonal quality from the original and helps to preserve transients at higher settings.
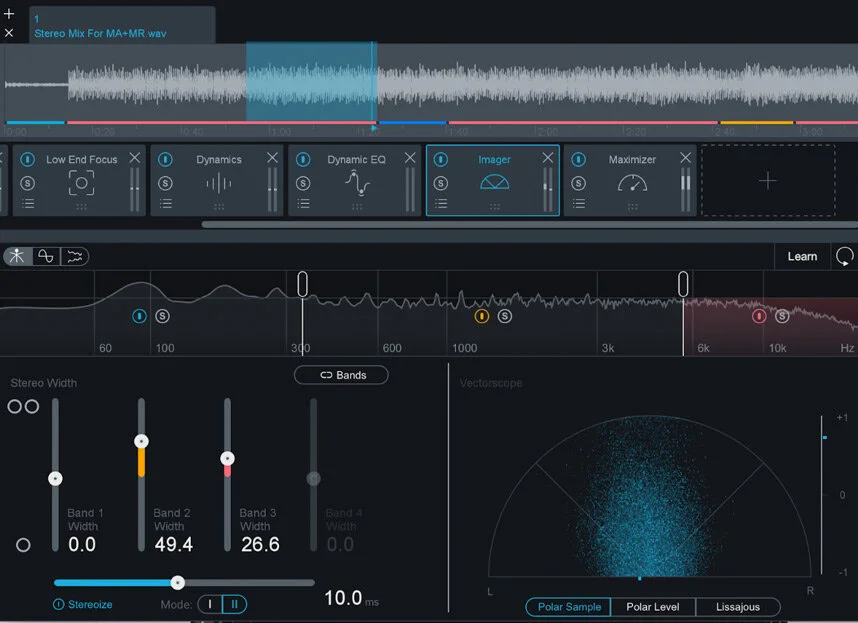
Ozone Imager in Ozone 9
Conclusion
Whether you’re a pro mastering engineer or mastering your own track for the first time, mastering can be a complex process—but it doesn’t need to be. Hopefully the intelligent tools and ways to use them outlined above offer some guidance on an initial mastering workflow. Be sure to check out more articles about audio mastering for more helpful techniques.