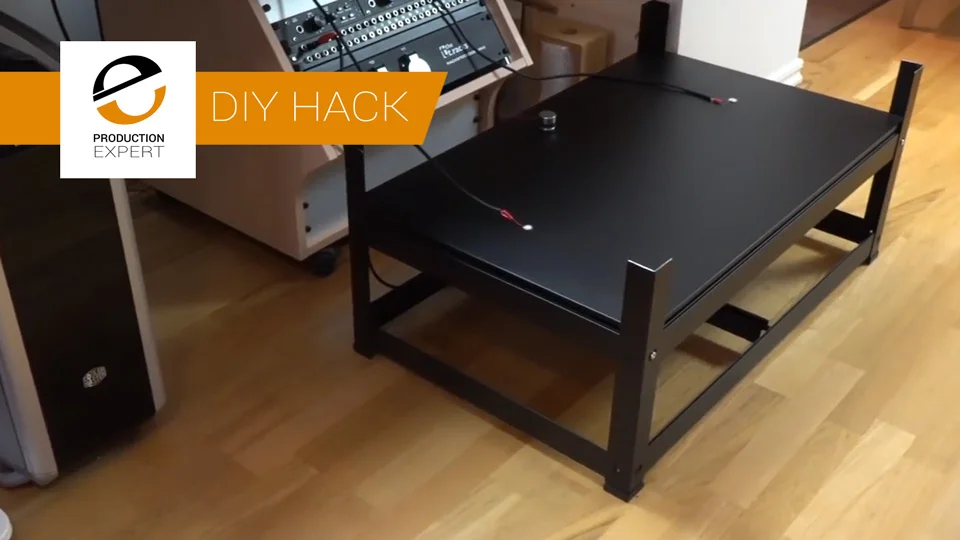
We came across this video from Youtuber LeoMakes in which he creates a DIY Plate Reverb from a ‘Bror’ Storage unit from IKEA for around $100.
What Is A Plate Reverb?
In recording history up until the invention of the plate reverb, reverb has effectively created by having a room with a speaker and a mic. Universal Audio’s Bill Putnam, Sr. was the first to use artificial reverb creatively on a pop recording in 1947, by using the studio bathroom to create the first reverb chamber. Bill continued to refine the technique building dedicated chambers in his Chicago based studio and this is where we get the ‘chamber’ reverb sound that we turn to in our digital reverb plug-ins. But what about the plate?

German company EMT (Elektromesstecknik) produced what was to become a ‘game-changer’ in 1957 with the release of the EMT 140 Reverberation Unit, which was the first plate reverb.
A plate reverb is made up of a large , thin piece of sheet metal suspended from a steel frame by spring tensioners at each corner. The pates were large, typically 2m x 3m. An electrical transducer mounted to the centre of the suspended plate to excite the plate, to make it move. Then you have 1 or 2 pickups are mounted to the plate as well, to pick up the plate movement and it is that sound which creates the effect. There is also a damping plate that allowed for the adjustment of the reverb time. All of these simple elements were then built into a heavy wooden enclosure.
Back to the DIY IKEA Plate reverb. Leo says…
This is a super-hacky prototype I made quickly as a proof-of-concept. It sounds nice, but there are several things that I will improve as time goes on, I would like to do with the selection of transducer and pickups (and probably a lot of other things).
Here is the list of the parts he used in the prototype…
IKEA Bror Legs ($16)
IKEA Bror Shelves -- you need two of these ($17 x 2):
A transducer (there are many options; this is the one he used. ($19)
Two piezo pickups (again, many options; these are what he used. ($1 each)
Small power amp kit ($18)
In the intro Leo explains how he came by the idea of using IKEA components and then in the first half of the video he demonstrates how it works and how it sounds. As it is a crude prototype he dampens the plate with a scarf or a heavy box, in fact he also ‘plays’ it by adding pressure with his hand.
From around 9:17 he shows how he built it. Unlike a conventional plate reverb where the plates are vertical, Leo’s plate is horizontal.
From 14:51, Leo presents his closing thoughts and how it could be improved. For example he found that the piezo pickups do pickup a lot of hum, which for this prototype he chose to filter out with a plug-in. My view is that because he has used unbalanced cabling for the pickups that could be a source for the hum. I would have considered wiring them balanced, or because they will be so high impedance perhaps put a DI box very close to the pickup which would turn it into a low impedance output that could be fed into a conventional mic pre-amp. There was also a suggestion in the comments about using 50mm piezo pickups for a better LF response, but as Leo says right at the outset, this is prototype, almost a proof of concept.

It is an interesting hack and is open to improvement and refinement. In researching for this article we came across another DIY Plate Reverb project from Ionosonde Recordings.
The cost of building this plate reverb was around $150. All materials needed (excluding electronics) were obtained from their local hardware store. Electronics on the other hand, came from RadioShack.
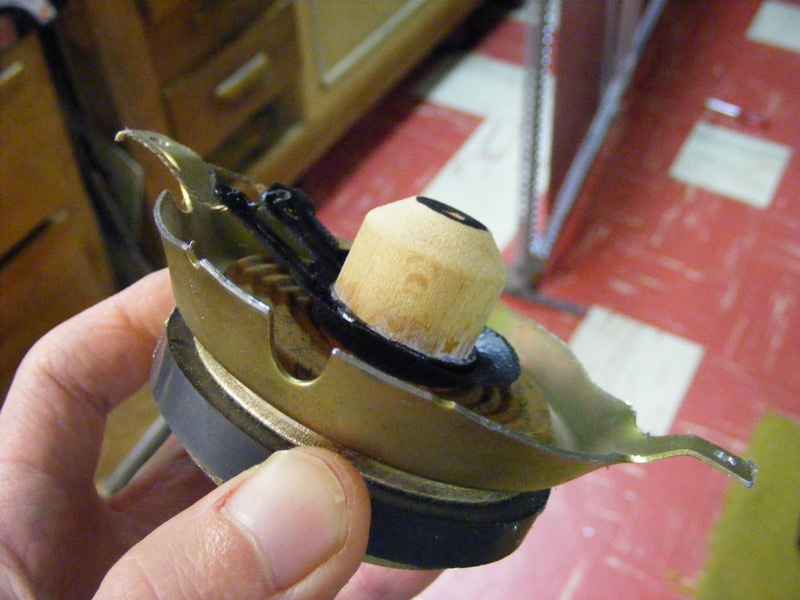
He used a modified speaker as the plate exciter with a small piece of a broom handle glued to the voice coil. He then used Rack Shack PiezoElements 1500-3000 Hz model: 273 073 which don’t seem to be available now. and then removed the outer plastic casing.

There you have it. Why don’t you have a go and let us know how you get on.