

With the release of Pro Tools 2022.4 came the new tiers of Artist, Studio and Flex. While there have been bigger releases in terms of new features, this release represents a huge change because of what it means for users of the middle tier product. We’ll leave the migration of surround formats down from Ultimate to Studio to one side but just as big a feature shift is the availability of Pro Tools Advanced Automation in Pro Tools Studio. Essential for Post workflows and something of a secret weapon for music mixers in Pro Tools, the Advanced Automation features are a huge point of difference between Pro Tools and most other DAWs. However, because all DAWs have automation, and the Advanced Automation features need explanation to be understood, they aren’t the most easily marketable features. But they are very powerful…
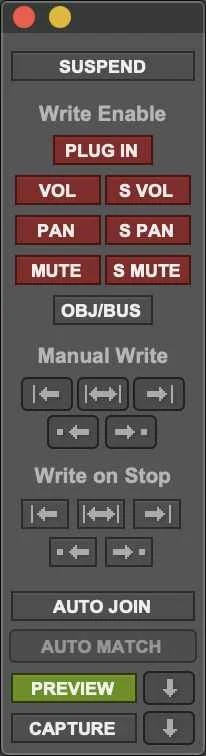
The Automation window of the old, middle tier Pro Tools was identical to the top section of the ‘full fat’ version now found in both Pro Tools Studio and Pro Tools Ultimate. The basics were covered in that you have a global Automation Suspend button and individual buttons to toggle automation on and off for Plugin data, and Volume, Pan and Mute on channels and sends. In combination with the four automation modes: Read, Write, Touch and Latch, the facilities on offer are much the same as found in any DAW.
The Advanced Automation features which have now become available to the middle tier Pro Tools Studio include additional modes, such as Touch/Latch and Trim and additional controls in the Automation Window including the Atmos-specific Object/Bus toggle, two sets of controls which control how and when automation is written, either manually or on stop, Auto Join and Auto Match, which help with writing new automation over existing automation, and the cryptic sounding Preview and Capture modes.
What Does Advanced Automation Do?
The problem which many of these features seek to solve is that of making sure that automation helps rather than hinders your mix. In a static mix, if you want to raise a fader a couple of dB you just raise it. If that fader is controlled by an automation playlist you can’t do that quite so easily. A simple illustration of how Advanced Automation can help with this can be found in Trim Automation. Trim Automation is an additional layer of automation which sits on top of mix automation, allowing offsets to be written trimming the levels up and down and can, but don’t have to be, consolidated with the original automation to allow further Trim passes.
Preview mode extends this by allowing underlying automation to be suspended and overwritten on a per-parameter basis and the complementary Capture mode allows automation to be captured across as many tracks and parameters as needed for use elsewhere on the timeline. All of these tools simplify the process of working with complex automation but exactly how do working professionals use them in their daily work?
In this article we share the thoughts of our expert contributors on how they use the Advanced Automation features of Pro Tools, starting with Michael Costa.
Michael Costa
I’ll talk about Preview. Rather than some instruction manual explanation of what it does, it might be better to throw in a real-world scenario where it might be useful.
Firstly, I like to almost always be in Trim mode (another Advanced Automation feature). So in this mode, you are never wiping out existing automation, you are simply adding or subtracting to what's already there. Example - let's say you've painstakingly automated a vocal. Maybe hundreds of little moves up and down, and you're really happy with it. Then you decide the whole thing, or maybe just one verse is a little quiet overall, but you don't want to lose all those micro changes you automated. What you want to do then is 'Trim' the section up a dB or so.
With that said a typical scenario where Preview is useful is when I've got a mix going and there's already lots of automation on there, so I don't want to disturb any of that. I just feel like the chorus isn't happening, but I'm not really sure what the problem is. I don't think the guitar is driving it enough, but if I push up the guitar, I might lose the energy from the piano. And maybe step on the vocal a little. I can't call it, so I need to experiment in a non-destructive way to push around loads of elements. It potentially might be every plugin parameter, send level, pan position, etc. But for this example, we're just doing fader levels.
So my goal is to push around the levels on a number of tracks and then in a single button press, compare what I now have to what I started with. If I've screwed things up, I can easily abandon ship entirely with no damage. But if I like my new changes, I can "Punch" them over the top of what I had, and the beauty is, I'm only 'trimming' the current levels, so all the existing underlying automation stays put - it just gets moved up or down. So how do we do this?
How To Use Preview In Pro Tools - A Step By Step Guide
1 - Put the tracks you want to mess with in Latch, Touch or Write mode. It can also be 'Trim' variant of any of these. That’s where I live most of the time, Trim Latch or Trim Touch. If you don't even know yet what you're going to mess with, just hold Option and put every channel into the automation mode of your choosing.
2 - Turn on Preview mode. So click the Preview button in the Automation window, or press the dedicated soft key if you've got a Pro Tools control surface that supports this.
3 - Press play and start pushing levels around to your heart's content. It might be over the whole song, but in my example I'm not happy with the chorus, so I'll select just that and have it loop while I tweak.
Once you touch a fader, you've now taken control of it and it won't move under existing automation. So if you've got significant micro automation in there that you need to preserve, this is when you should be using Trim Latch or Touch. That way, you're only adding or subtracting to what's there and not actually replacing it.
4 - So now you've re-balanced things, but you may have made 10 changes, so you don't know if you've made things better, or just different. It's time to compare back to where you started.
It's important to understand that you haven't actually written any automation yet - you've simply put a bunch of changes into the automation buffer. It's like when you cut or copy some text in a word processor - it still needs to be pasted to its new home.
So before we commit to this change, we need to compare against our original using "Suspend Preview." DO NOT click on Preview again, as it will simply dump your new changes and bring the original mix back.
5 - You need to command-click (Control on Windows) the Preview button and you will then be hearing the original. You’ll see your on screen (or real) faders jump back to their original position. Then you can command-click back and forth on the Preview button to toggle between them.
Then assuming you like your changes and want to keep them, you need to select the area where you want to write your changes. In my example here, it's just the chorus so I select the length of the chorus ON ANY TRACK! I don't need to select across any particular track because this is only about the timeline selection. The Preview buffer knows which track everything belongs to.
Now with my selection made, I need to 'Punch' my Preview. Think of this as pasting the contents of my buffer, but in this case the buffer could be holding thousands of individual parameters.
6 - Next to the Preview button you will see a downward pointing arrow. If you click on this arrow, you will see your automation buttons change to bright red, indicating the changes have been primed.
7 - You now press the 'Write to All' button to commit the change. That's the button that looks like a horizontal arrow pointing left and right with vertical lines at each end.
There are a bunch of variations on this workflow, depending on your intentions, but this is just one. I know it seems like a lot of steps right now, but I remember the day the penny dropped for me, it was life-changing (in a workflow sense).

Suspend Preview - Pro Tools Automation’s Secret Weapon
In Michael’s very thorough explanation of the how, why and when of Preview Automation you’ll have noticed how much of the convenience and usefulness of using Preview is due to the ability to quickly A/B between your old and new automation in context with your mix using Suspend Preview.
Nathaniel Reichman was equally effusive about the benefits of this feature:
Nathaniel Reichman
My favorite Pro Tools automation mode is Suspend Preview. But first, let’s talk about regular Preview. To use Preview, take a track that already has some automation on it. That could be volume, pan, plug-in automation, etc. Put the track in Touch or Latch mode. Then press Preview and make adjustments to any automatable parameters. You’ll see the track automation mode box turn green. Green means that you’ve made adjustments that you are hearing, but have not been written to the automation lanes yet (you could write these new adjustments by pressing Write to Selection, or punch the values in the next time you hit play with Punch Preview, but don’t do that yet).
Instead, command-click on the Preview button, which puts you into a special mode called Suspend Preview. This is the absolute best way to audition possible changes to your mix. And when working with a client present, you can quite simply say, “Here’s how it sounded before, and here’s how it sounds now if we make those changes.” You can A/B before and after for as long as you want by toggling Suspend Preview. And, you can stack up as many mix tweaks as you want in one Preview buffer. I was running a mix session with a well-known producer who uses Logic. He watched as I changed the vocal reverb send level, the reverb time, the reverb damping frequency, the keyboard level, and the EQ on the drums all in one Preview buffer, and A/B’ed between the old mix and the new mix with one button press. In the Logic crowd, that raised some eyebrows!

So Nathaniel and Michael are both enthusiastic about this workflow. However it is perfectly possible to work without ever using this feature, a point made by Graham Kirkman who has an unconventional but equally viable approach to mixing with automation in Pro Tools:
Graham Kirkman
I always use Latch/Touch. As a general rule I’ll start each job in Latch and get to a point where it’s almost correct then switch to Touch to do ‘pick up’ automation moves (fine adjustments if you will). This is because unlike 99% of other tracklayers I start with all the audio track faders pulled all the way down and automate the mix as I go (controversial I know) but I much prefer the sound of crossfades and general level through fader moves - it’s the way I was taught - rather than all at 0db and clip gained and ‘rendered’ fades, although I still use clip gain as well so it ends up more of a hybrid approach. On subsequent passes I’ll further tweak with VCA’s using trim only on AUX tracks where I’ve already performed complex automation but need it all adjusted relatively.
Again - almost certainly opposite to my peers - I never use Preview/Capture. Not because of some superiority complex or ego boost but just because I’m very old and learned to mix on systems that didn’t have this facility so I’ve always got by without needing this function. I’ve worked with people who do use it and can see just how powerful it is but I think I’m too long in the tooth to bring it into my workflow now. Essentially, not using it doesn’t slow me down at all which may be the most important point? As for Auto Join and Auto Match - nope, never needed them either. So maybe the primary point of my contribution to this post is that if all these Advanced Automation tricks scare you (as a beginner) then don’t stress - you absolutely don’t need to learn them straight away and overwhelm yourself.

So Graham’s point makes an excellent one with which to conclude. With Pro Tools Studio Advanced Automation has become available to a whole new tranche of Pro Tools users who didn’t previously have access to it. It’s very powerful but it’s complicated and potentially confusing. Use as much or as little of it as suits you but it would be a pity to miss out on such powerful features just because you didn’t know what they do or how they might help you!
To see a demonstration of how to use Preview and Capture Mode in Pro Tools watch these two videos from our Premium Tutorial Channel.
More On Advanced Automation
If you want to learn more about Pro Tools Advanced Automation we have a series of four in depth tutorials on Advanced Automation on our Premium Channel. Click the image below to find out more about this series of videos totalling over 55 minutes in total.
How Can I Watch These Videos?
Firstly you can watch the preview section of this video for free, no charge and with no signup. If you have not yet signed up to the new platform, and you want to watch the rest of this video, and hundreds more like it, then you can by signing up for a free 7-day trial. If you aren't satisfied it is a good deal then cancel the subscription within the 7 day trial period and it won't cost you a penny. If you like it then for just $3.99 per month you can watch this and hundreds more videos like it.
If you are already an existing subscriber to our new video platform, then thank you for your support and you will be able to watch this video all the way through.
