
While the technical paradigms of recording, sound design and mixing constantly advance and shift as DAW/plugin technology develops in new directions, the timeless art of arrangement is largely constant in its fundamental principles. Here are three age-old concepts plus one powerful, relatively new DAW-enabled workflow to keep in mind when arranging your own tracks.
Density And Dynamism
Generally speaking (and with the exception of certain styles of hard rock and metal, amongst other stylistic ‘anomalies’), a good arrangement will strike the right balance of punch, weight and ‘air’, giving all of the involved instrumentation space to breathe without any of it at any point sounding thin, shallow or insubstantial. Finding this equilibrium can be tricky, with the temptation to pile on more and more layers and parts often arising from over-familiarity with the track as it progresses, and a consequent loss of perspective and objectivity. One solution to this is to reset your ears by periodically taking a break from the arrangement – be it hours or days – so as to better appreciate the bigger picture upon returning to it. And once it’s getting towards what you might consider ‘finished’, experiment with taking parts away to determine whether or not they’re really contributing anything meaningful to the song or track. If any of them aren’t, leave them out.
Of course, an arrangement isn’t a static thing, however, and its density can and should change over time. There are plenty of tricks you can use to create a sense of movement and progression through the various stages of a track: thicken up the guitars for the chorus with double tracking; introduce hand percussion elements behind the drum kit in the bridge to change up the feel of the rhythm section without compromising the groove; use low-level synth pads for ambience in the verse, and so forth.

Always Keep The Vocal In Focus
When arranging songs of all kinds – from the sultriest of jazz ballads to the most intense of death metal screamathons – the vocal has to take priority whenever it’s present in the mix. Obviously, this means the recording itself must be of the highest possible quality, but it also implies that the instruments working around the vocal should do so in a supportive fashion, rather than competing with it for attention. While automated volume fader adjustments and sidechain compression are the go-tos for establishing this particular relationship at the mixing stage, the arrangement of the track also contributes to it in a big way.
The heavy handed approach to arranging instruments around vocals is to simply pull entire melodic parts out to make room for the vocal when it appears (a keyboard or guitar line, say, should both be relevant), and this can be very effective if done well – dropping almost everything but the drums and bass for the verse, a la Smells Like Teen Spirit, for example. Often, though, it’s better to just thin such parts out, switching complex strumming patterns or arpeggios to sparse chords, perhaps with judicious embellishments in the spaces between vocal phrases.

Arranging Drums
In beat-driven music (pop, rock, dance, etc), the drum kit plays a key role in driving the raw energy of a track, and its richly varied sonic palette makes for a very effective arrangement tool if you and/or your drummer know how to deploy it as such. For example, while the ticking sound of tightly closed hi-hats is frequently the most appropriate option in the verse, where you might want to invoke a sense of apprehension leading into the chorus, when that chorus arrives, loosening them up to the half open position, or moving over to the ride cymbal with the leading hand, will dramatically up the energy of the song, regardless of all other instrumentation.
Similarly, introducing a few incidental tom hits to the main drum groove, worked into the kick/snare backbeat, for the second half of a verse or middle eight can suggest a subtle shift in intensity or increase in tension. And if you want to get a bit – or a lot – weird and/or folksy with your arrangement, there are endless creative angles to be exploited: turn off the snares; switch from sticks to mallets or rods; substitute the usual drum set with a cocktail kit; or take a leaf out of Peter Gabriel’s mad book and bin the cymbals and hi-hats altogether for, like, the whole album!
Arranger Tracks
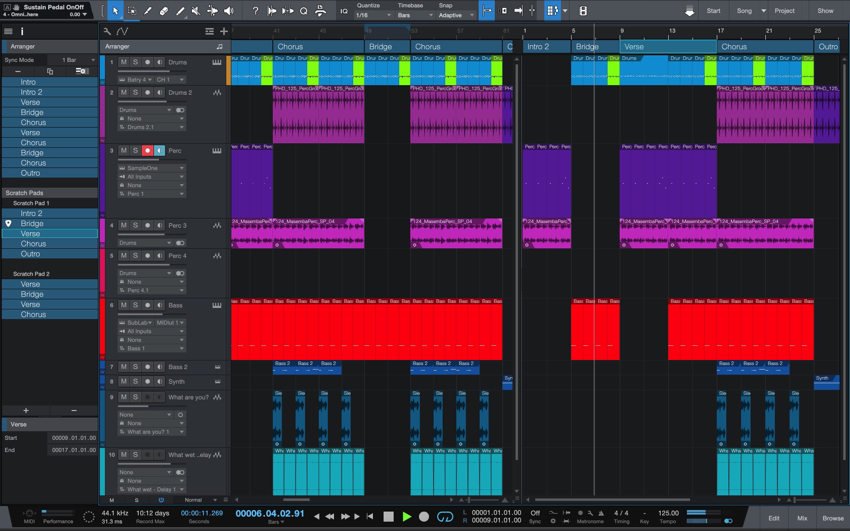
Several DAWs – among them Logic Pro, Studio One, Cubase and Tracktion – feature dedicated ‘arranger tracks’ (the naming varies between DAWs), enabling user-specified ranges of material on the arrange page to be defined as discrete blocks (‘Verse’, ‘Bridge’, ‘Chorus’, etc), which can be freely rearranged in order to quickly and easily experiment with song structure and form. You can also make and edit copies of blocks, then mute or remove select parts and tweak automation within them to create variations (‘Verse with guitar’, ‘Verse without guitar’, etc) that can be swapped in and out of the arrangement for immediately comparison.
Cubase and Studio One take this idea a step further, too. Cubase’s Arranger Chain – of which you can have as many as you like, for comparison of arrangement ideas – shows all your blocks in a reorderable list that defines the non-linear order of playback, jumping the playhead around the arrangement in accordance. And Studio One’s Scratch Pads provide a sort of storage space for Arranger Track blocks, keeping everything tidy, as well as facilitating A/B comparison of arrangements.
Sure, you can do all of this stuff manually, but the point in the ‘arranger track’ concept is that it lets you treat the sections of your arrangement like a series of clips, rather than having to negotiate a potentially massive stack of disparate parts individually – a vastly preferable workflow.
Do you tend to adhere to any particular cornerstone techniques when it comes to the arrangement stage of your own production process? Share your insights in the comments.
Photos by Kenny Eliason And Obie Fernandez on Unsplash
