
In this article Robbie Dwyer suggests 5 things Cubase does that are better than some other DAWs
For the last 18 months, I have been using Cubase because it does something that no other DAW does, which is the ability to record remotely with anybody in the world providing they have a good Internet connection. Now I know that there is AudioMovers and Source Elements that enables a ‘work around’ but Steinberg have really nailed it with their VST Connect software, because it has the functionality of both the AudioMovers and Zoom connection in one neat package. If you want to know more about VST Connect and how I came to use it, then take a look at my previous article here.
But what else is there in Cubase that other DAWs don’t do as well or even don’t do at all? Steinberg has definitely added a few features that have been brilliantly thought out that other DAW manufacturers could certainly take note of.
Let me present to you 5 things that Cubase Pro does, that most other DAWs don’t.
Control Room
1: The Control Room
The Control Room can only be found in the Cubase Pro version and once you understand its benefits, you quickly realise that this is a powerful feature, not to mention a great time saver when you work in the box. When you enable this in Cubase, it takes over all of your outputs and it is separate from the Mix Bus, which is incredibly useful as you’ll see shortly.
The Control Room allows you to create up to 4 Headphone Cues that can be routed discretely, providing you have an interface with enough Line Outputs. They each can be independently adjusted in terms of their overall output level, the amount of click track volume and if it needs to be panned, as well as whether the Talkback is engaged or not. The ability to mix the Headphone Cues is taken care of on the Mixer window. This is a dedicated section so as not to be confused with any effects sends that you might have going on.
There is also the ability to set up to 4 different Monitors that can be easily switched over without the use of a hardware controller. Again, this is very dependent on whether your interface has sufficient outputs. In my situation at home, I have 3 sets of reference monitors that can easily be switched from within Cubase rather than having to use the Apollo Console software.
Then when it comes to communicating with the talent, it has a Talkback button that can either be clicked on with the mouse or like I have, you can assign it to a hot key; in my case this is the Tilde § key. It is very much integral to the VST Connect software when communicating with the Artist too.
The pièce de résistance within the Control Room is the fact you can add inserts. Now if you are like me and have Sonarworks (Sound ID Reference), changing monitors and the calibrations can be a real pain in the rear. But not now, because each monitor has the ability to have its own plugin, I can instantiate Sonarworks on each monitor and call up the calibration. Then every time I switch monitors, it switches the calibration profile too. In addition to the monitors, I can even add inserts on to the Headphone Cue mixes for the artists too.
Because the Control Room is separate from the Mix Bus output, it means that I don’t need to switch off Sonarworks and end up accidentally printing the calibration to the mix. Genius!
Export Queue
2: Queue List
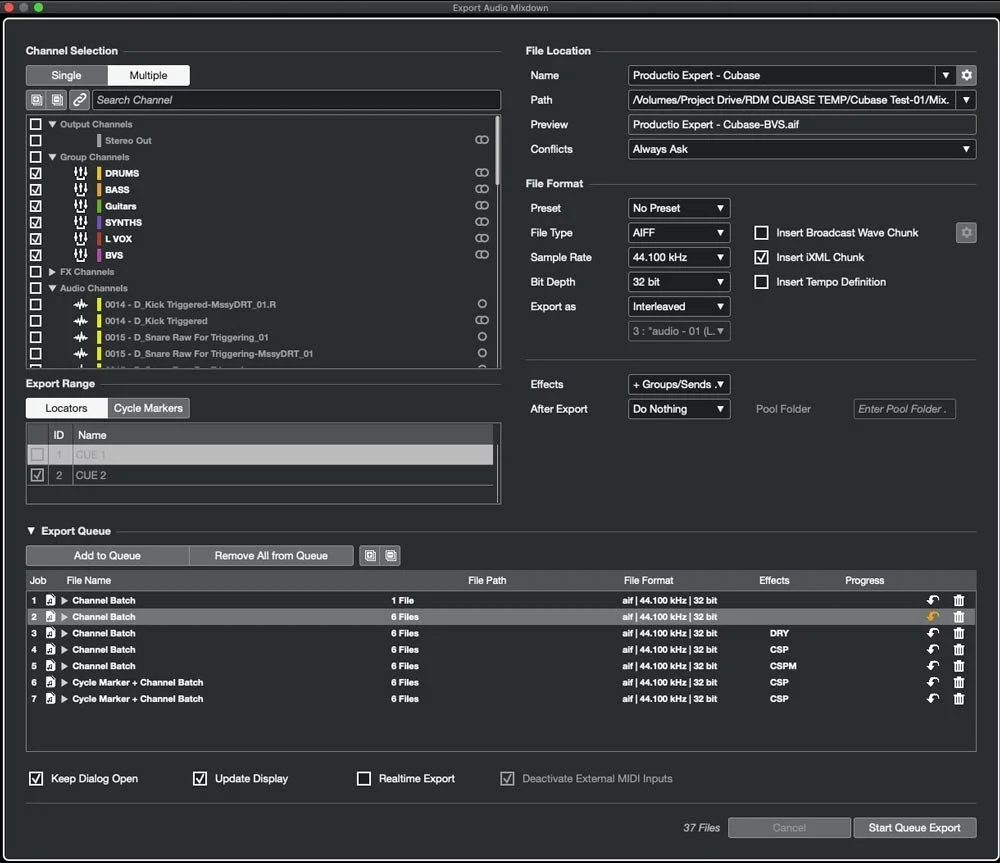
Exporting a variety of Mixes, STEMS and Cues can be quite a laborious task. However, in Cubase they have tried to simplify and help with the process by creating an Export Queue in the Export Audio Mixdown window. This is essentially an automated process that you can set up to save you some time and sanity.
Here you can set and add different Queues depending on the needs of the client.
For example, you can set up a Stereo mix, but in addition to this, you can run off individual or groups of audio tracks, as well as STEMs.
The clever part in this is you can choose as to whether you want the channels/STEMs to be DRY (no processing at all), Default (channel strip processing only), CSP (channel strip + FX Sends used) or CSPM (the whole signal path from channel to mix bus).
The length of the mixes can be based on their location markers (start to finish), but for those who work in TV and Film, you can get Cubase to Export the different Cues in batches.
The most useful aspect of this is before you run the Export, you can go back and make changes to any of the Queues you have set up and update them, simply by clicking on the arrow which will now display as orange to indicate that a change has been made.

Channel Settings
3: The Channel Settings
Quick visual checks of what processing and routing you have on a channel can be difficult, but on each channel, Cubase has a little ‘e’ symbol on each track header. Clicking on this brings up the entire signal path for that channel, a bit like the Slate plugins but only in more detail. Here you can view the inserts you have used. It also displays their own set of tools such as Compressors, EQ, Saturation, De-esser, Gate and Limiter. The order of these can be quickly swapped by dragging and dropping them. It shows the Sends and Cues but when you click on the settings you can open this up further to show any other path that the channel might take right the way through to the Mix Bus. It provides great visual feedback and can really help the process of monitoring what’s going in the mix.

Mix Zones
4: Mix Zones
When you have a lot of faders and mix paths on the screen, then you are going to be scrolling quite a bit to navigate around the project, especially if you have crucial channels at one end, like the Mix bus. Cubase has provided the option to split the mixer up into 3 Zones. Left side, Centre and Right side. Essentially you are pinning certain things on the Left and Right side of the mixer and then the Centre part still scrolls as you normally would. This is useful if you want to keep your Mix Bus visible at all times and you can pin that on the right-hand side. Then, if you are tracking vocals, then you might want to keep the tracking channels visible on the left. This function definitely comes into its own if you lack screen real estate and need to keep things visible.
5: Useful Bonus Tools
Cubase offers a few useful tools which offer processes usually only available if you buy third-party software.
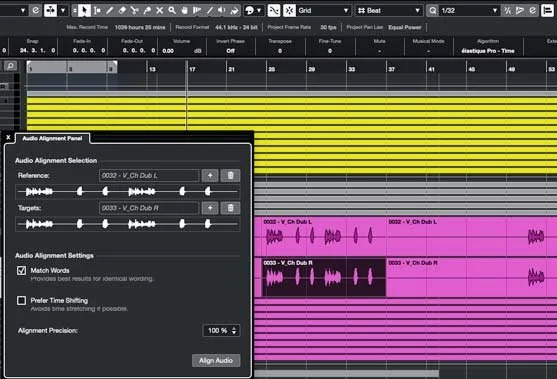
I. Audio Alignment: This is a simple version of what Vocalign does and it does a pretty good job. It doesn’t have the same level of control as Vocalign but it certainly does a solid job when tightening backing vocals.
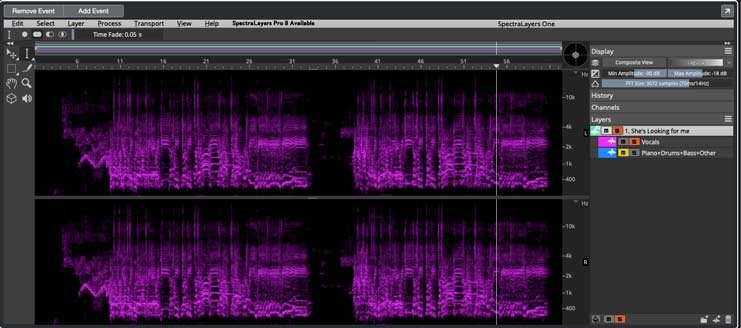
II. Spectralayers One: This is an element taken from Steinberg’s Spectralayers audio restoration software. What Spectralayer One allows you to do is extract vocals from virtually any fully mixed song. This leaves you with both a vocal track and an instrumental track. This is an ideal feature for those wanting vocal parts for remixes. I have found that it works very well with good clear vocals in a track, but it does struggle a little more in very dense mixes.
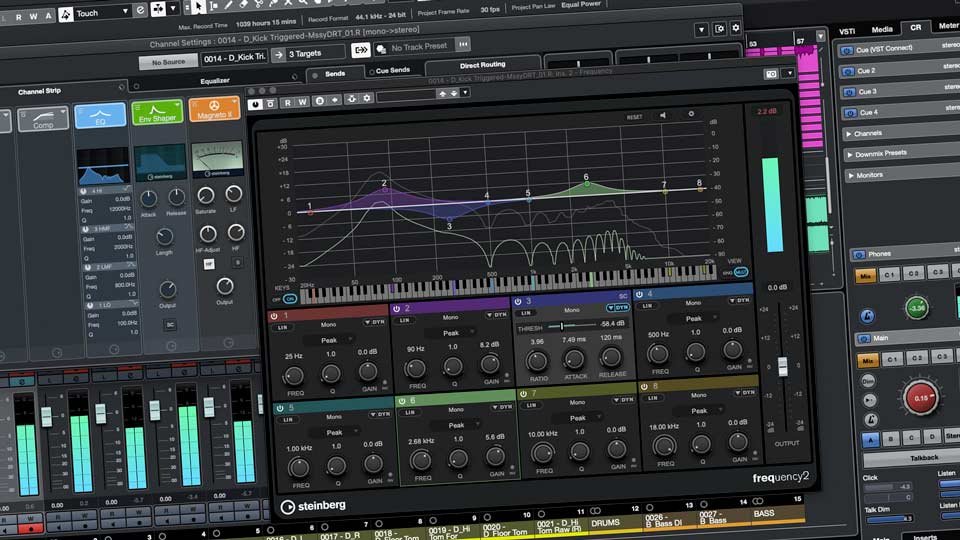
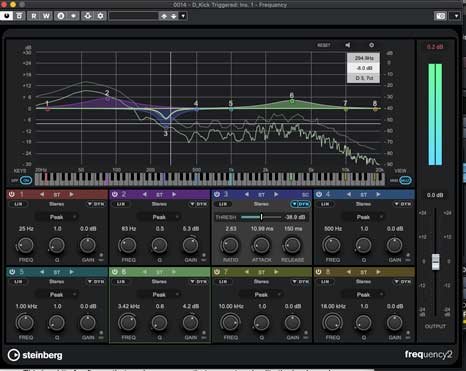
III. Frequency2: This is an in-built Dynamic EQ. Although it’s not as slick as FabFilter’s Pro Q3, it still does a more than adequate job when it comes to dealing frequencies that either need attenuating or boosting.
These are just 5 things that I have so far discovered which are different or non-existent in other DAWs, but there is so much more to Cubase in terms of its capabilities.
For more information about Cubase Pro, head over to the Steinberg website to discover why Cubase is still a top DAW.
