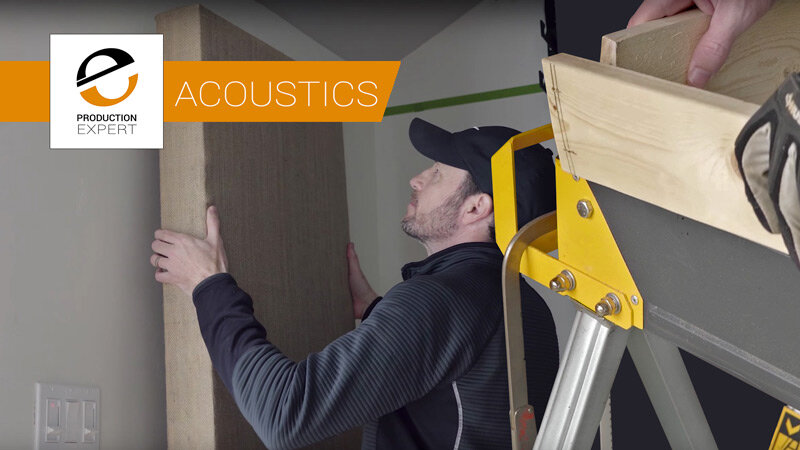
Is your studio in desperate need of some acoustic treatment? You may well have done a fair amount of research into what solutions are available and noticed that a great many off-the-shelf acoustic panels can cost around £100 each. However, if your studio needs several panels, the overall cost to treat your room is going to get expensive fast. While off-the-shelf panels are readily available and super easy to install you can avoid spending a heap of cash by putting an afternoon aside to build them for yourself, with some basic tools, at a fraction of the cost.
In this article, we share a video produced by Ray Ortega who shows how to build acoustic panels at home. In this video, he walks you through the entire process including measurements, where to install wood braces, and, most importantly, how to install the absorption material and fabric covering.
We take his video further by pricing up the cost of making six panels for around £300 making the cost of each panel around £50 representing a saving of around 50% compared to pre-built off-the-shelf panels.
Six panels are a good number of panels to start addressing an untreated small to the medium-sized studio. if you find you need more you can simply build two more at a time. If you are prepared to get hands-on with some tools and materials to save some money on equipping your studio with some acoustics then watch Ray’s video and read on…
The Tools You Will Need To Build Your Own Acoustic Treatment Panels
Basic hand tools such as screwdrivers and hand saws will suffice although a power saw and electric drill will help speed up the fabrication process. If you plan on making several of these panels and don’t own any power tools we recommend you borrow or rent some otherwise the project could take you a lot longer than you bargained for.
Basic Tools
Screwdriver
Handsaw
Measuring tape
Straight edge
Drill and wood drill bits
Staple gun
Recommended Tools
Jigsaw or circular saw
Measuring tape
Straight edge (preferably with a defined 90° edge)
Drill and wood drill bits
Staple gun
Health And Saftey
You must exercise smart health and safety practises when working with any kind of power tool. Wear eye protection when working with power saws and gloves when handling timber to avoid splinters. We strongly recommend you continue wearing gloves after working with power tools as Rockwool and breathable fabrics can irritate skin quickly. Also, ensure the environment you intend to work in has plenty of space to move around in and that the floor is clear of any potential trip hazards. If you don’t own a set of sawhorses for cutting wood then a sturdy and level work surface is a must. If you don't feel 100% confident in your abilities to undertake a project like this safely ask the help of someone you know who has some basic carpentry skills.
Acoustic Panel Dimensions
Height: 49”
Width: 24.5”
Depth: 4”
The Materials You Need To Build Acoustic Treatment Panels
Buying materials in bulk is the best way to save on costs when undertaking projects such as these. First, you need to establish how many panels your studio needs as this number will dictate the amount of material you will need. As we stated earlier, we are going to price up the cost of building six panels for around £300.
Timber
The best way to save money in projects such as these is to shop around for planed timber. You will need nine 1x4” planed timber in 8’ lengths to make six box frames:
• 3 lengths are needed to get six 47” lengths measured and cut
• 6 lengths are needed to get six 47” and twelve 24.5” lengths measured and cut
This will give you twelve sides, six tops and six bottoms of the frames with barely any wastage.
To brace the centre of the frame you will need some extra 1-inch thick timber. This doesn’t need to be the same type of timber, try to find cheaper cuts to save money. Ray’s video showed him installing corner braces.
I got a quote of £60 for 9 lengths of 8’ timber from my local builder’s yard and £15 for some extra 1” thick timber for the centre and corner braces.
At this point, our £300 budget to build six acoustic panels has £225 left in the kitty.
Screws And Staples
You are going to need ten screws suitable per frame:
Two in each corner
Four for the centre brace (one for each side)
Eight for the corner braces
You can, of course, use more if you wish to make your frames more solid but we recommend 20 screws per frame.
The same local yard close to me stocks packs of 100 wood screws 6 x 80mm for £12. I will need more than one pack for this project to make 6 panels but it’s good to have some spare screws lying around for future projects.
Absorption Material
The meat and potatoes of these types of acoustic panels is Rockwool. Buy the slabs instead of the rolls as slabs hold their shape better and are easier to fit into the frames. A quick internet search found a pack of x6 75mm thick slabs that will fit the dimension of my frame for £25 delivered. With the screws, Rockwool and timber our budget still has £176.
Fabric - Pick Your Colour
You will need some form of fabric to cover the back of your panels to prevent loose particles of Rockwool falling out. You can use a breathable fabric but there is a cheaper way. Instead, use some old bedsheets. Don’t worry what they look like as you won’t be able to see the backs of these panels when they are hung on your studio walls.
For the face of the frames, you can use a material similar to what Richard used, though we recommend you opt for a different product that gives you a choice of colours to match the style of your studio.
GIK Acoustics provides a range of very attractive Camira fabrics available in a range of colours 1.7 metres wide costing around £10 per metre. To cover 6 panels we will need at least one meter per frame. The 1.7 metre width will be absolutely fine for covering the lengths of the frames. We recommend you get an extra metre to be on the safe side as you need excess material around the back of each of the frames when using the staple gun to cover the unit.
GIK only supply minimum orders of 5 meters. Many other companies that provide the same if not similar products also require a minimum order. For seven meters, including delivery and VAT, the cost of fabric comes to £90.
Job Done - With Cash To Spare
Ray’s excellent video shows you exactly how to build your own acoustic panels. With this price guide, you should be able to tackle a project like this on a very modest budget. Depending on what you intend to spend you can potentially save some money as well!
In our £300 budget, we still have £86 leftover making the material cost around £35 per panel. You will need to also buy some suitable brackets and wall plugs to securely hang your panels from your studio walls. Be sure to get fixtures that can take the weight of your new panels as, if not installed correctly, could cause a lot of damage if they drop off.