
A while back we asked you to submit your studio design and build stories. Well, community member Artur Rakhmatulin emailed recently apologising for the delay in submitting his studio design and build story. He explained that it had taken much longer to accomplish it than expected, but during this process, he shifted his paradigm several times and so came out differently from what he first intended. This is Artur's story and experiences spread over 3 parts, the theory, structure and additional treatment. So over to you Artur...
Introduction
Everything in this world begins with something, and in my case, everything music-related started with a dream. When I was a little kid I dreamt of becoming a musician, I played with my imaginary band “Parabola”, strumming without any understanding my uncle’s bass guitar Musima DeLuxe 25B and beating a rhythm on a cardboard box or a bucket.
Later in my youth, I used two tape cassette recorders for multitrack recording of my electric guitar profligacy – one for playback and one for recording, swapping tapes after each take. I knew that becoming a musician starts with a professionally produced song – with appropriate harmony, sound texture, quality, and impact. Legends like Pink Floyd, Deep Purple, Led Zeppelin, Queen and great modern bands were my beacons and had set a very high bar I’ve always wanted to reach.
My constant movement towards my dream shifted me through many planes of knowledge and exploration – guitars, synthesisers, DAWs, music theory, producing, mixing and even marketing. At some point, I understood that in order of achieving a great sound I needed a good set of studio monitors as in my mind they were an essential element of my success.
So, after a brief research, I began living with the idea that my current KRK Rokit RP5 should go and Adam S3X-V should take their place as my monitors. Knowing the cost of speakers, I thought that it would be a good idea to listen to them before buying, so I found a studio with these monitors and booked few hours. As it was my first trip to a recording studio in my life, I took some time to prepare myself and put some tracks I knew well on a USB stick. I did everything on a whim, not knowing what to expect.
Everything Changed
The moment I stepped inside the control room I understood that my life would never be the same. With all my heart, I can say that these few hours made the biggest impression in my musical activity. Although, let’s face it - my whole life. I would never have thought that I can see the sounds floating in front of me – I can see their form, their texture, I can feel their thump in my chest. Truly, it was a revelation.
So, after I returned to this dull world I’ve ended up with three main things:
- I needed a control room with appropriate acoustics;
- I needed 3-way studio monitors to get full frequency range;
- I just needed to spend some time with two things I mentioned above to get my production level to what I had in my mind as a standard.
During this event, I made another step towards my dream, and I knew what should I do next.
Theory
After some brief exploration of studio building services and their approach, I came to the conclusion that the most inexpensive and efficient way to get a control room that suited my needs and my vision was to build it myself.
However, I knew nothing about studio design or room acoustics, so some significant amount of study would form the backbone of a knowledge-base and so the next few months were spent reading books on room acoustics and studio design.
Book List
Here’s the list of books I plunged into that gave me enough information to take the next step...
| BOOK | AUTHORS |
|---|---|
| Recording Studio Design. Second edition. | Philip Newell (My Bible) |
| The Studio SOS Book. Solutions and Techniques for the Project Recording Studio. | Paul White, Hugh Robjohns, |
| and Dave Lockwood. | |
| Studio and Playback Halls Acoustics. | V.S. Mankovskiy |
| Acoustic Absorbers and Diffusers. Theory, design and application. Second edition. | Trevor J. Cox and Peter D’Antonio |
| Master Handbook of Acoustics. Fifth Edition. | F. Alton Everest, Ken C. Pohlmann |
| Home Recording Studio. Build It Like the Pros. | Rod Gervais |
| BBC Engineering Monograph No. 64 Data for the Acoustic Design of Studios. | A. N. Burd, B.Sc., A.Inst.P., C. L. S. Gilford, M.Sc., Ph.D., F.Inst.P., A.M.I.E.E., N. F. Spring, B.Sc., Grad.Inst.P., Grad.I.E.E. |
| BBC R&D White Paper WHP 021 Acoustic criteria and specification. | R. Walker |
| Sound System Engineering. 4th Edition. | Don Davis, Eugene Patronis, Jr., Pat Brown |
| Mixing Audio. Concepts, Practices and Tools. | Roey Izhaki |
| The Mixing Engineer’s Handbook. Second edition. | Bobby Owsinski |
I don’t usually find myself a natural learner for mathematical and physics stuff, such as formulas, equations but it seemed to understand written knowledge in those deep-science books quicker and more easily than normal. Of course, I skipped some things in those books that I found irrelevant to my case, such as drums recording rooms, surround control rooms, mobile control rooms, etc.
After I’ve read some of the above-mentioned books I’ve defined the limitations I’ve had at the moment and began building up my concept from there.
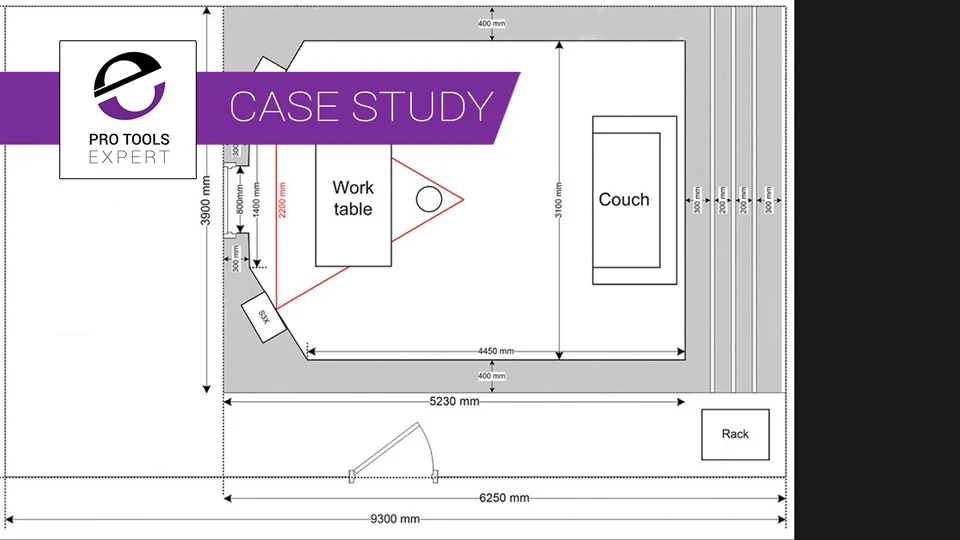
My Room
At my disposal was a heated basement in my family country home which had the following characteristics...
| Parameter | Data |
|---|---|
| Room length | 9,3 m |
| Room width | 5,61 m |
| Room height | 2,57 m |
| Room overall area | 52,17 m2 |
| Walls | concrete, finished with plaster |
| Ceiling | concrete slabs, finished with plaster |
| Floor | floor tile |
Initial Requirements
Despite the fact that room had a quite generous length and width, it’s height was the stumbling block. Also, I had no freedom of using the whole room, so I’ve ended with the following initial data to use in my work and future project:
- The requirement for high absorption of low frequencies due to low ceiling;
- The need for acoustic isolation and soundproofing due to the limited use area;
- The sufficient opportunities for room configuration;
- The demand for simple climate and heating system, no need for substantial infrastructure.
Initial Plan
Writing down all the limitations and possibilities helped me concentrate on types of knowledge I needed to acquire on priority. So, after digging in scientific books, websites and online social networks, I decided to apply the following approach...
| SELECTED SOLUTION | FREQUENCY RANGE | ADVANTAGES | DRAWBACKS |
|---|---|---|---|
| Perforated plywood (Helmholtz resonator) | Lows to mids | High efficiency in low and low mid frequencies; | Room volume reduction; |
| Low cost | Ineffective in high frequencies | ||
| Broadband porous absorbers | Mids | High efficiency in mid frequencies; | Ineffective in low frequencies; |
| Low cost | Low efficiency in high frequencies | ||
| Acoustic foam | Highs | High efficiency in high frequencies | Ineffective in low and mid frequencies |
While I was selecting solutions for sound absorption, I defined the primary goals I needed to achieve with the acoustic treatment...
- Low-frequency range from 32 Hz to 125 Hz should have an RT60 within the recommendations of EBU/ITU, IEC/AES, BBC etc.
- Frequency range from 125 Hz to 20 kHz should have an RT60 as small as possible to get a dead sounding (quasi-anechoic) room;
- Above requirements should be met at 100 dB SPL.
Aim To Get The Best I Can
I understood that some of these, if not everything, sounded a little bit extreme but I’ve wanted to get as much control over the acoustic, discarding room interference and also be able to have a faithful reproduction of music even at high SPL settings.
As I had limited area I could use for my studio, the first step I made was determining room dimensions so that the next step should be modelling and precise configuration of acoustic treatment. To define room size proportions, I was referred to these documents...
- Richard H. Bolt recommendations, Note on the normal frequency statistics in rectangular rooms, 1946;
- EBU/ITU recommendations, TR R22, 1998;
- IEC recommendations, IEC TR 60268-13 Sound System Equipment – Part 13 Listening tests on loudspeakers, 1998;
- Trevor Cox recommendations, Room sizing and optimisation at low frequencies, 2004.
As there was a necessity for a lot of low-frequency absorption, my only option was to go with the longitudinal orientation of working space, placing a highly absorptive bass trap in the opposite corners to studio monitors end of the room. So, after few basic calculations, I’ve ended up with the following parameters of my studio...
| HEIGHT | WIDTH | LENGTH | |
|---|---|---|---|
| DIMENSIONS | 2,57 m | 3,9 m | 6,25 m |
| PROPORTIONS | 1.00 | 1.52 | 2.43 |
| OVERALL ROOM AREA | 24.38 SQ METRES | ||
| OVERALL ROOM VOLUME | 62.64 CUBIC METRES | ||
After I had defined the dimensions, I began modelling the acoustic environment of my control room, using these tools...
- Acousticmodelling.com - an instrument to calculate the Helmholtz resonator configuration, thickness of porous material and overall frequency range;
- Whealy.com - an alternative tool to check that my modelling was correct.
- Self-made Excel calculator – not that I’m some inadequate person, but I wanted to check that my understanding of room acoustic theory was right so I’ve made my own Excel calculator which I used to compare the results.
In order to get a correct model, it was important for me to choose the materials that I was planning to use so that they could become part of the equation.
| MATERIAL | APPLICATION | REASONS TO USE |
|---|---|---|
| 10mm gypsum plasterboard | Outer walls | Fairly cheap; |
| Easy to use; | ||
| Fire resistant; | ||
| Nontoxic; | ||
| Capable of some sound absorption; | ||
| Can be decorated. | ||
| 15mm indoor plywood | Perforated panels | Durable after perforation; |
| Practical for mounting; | ||
| Nontoxic (indoor material); | ||
| Can be decorated. | ||
| 50mm & 100mm Rockwool Acoustic Batts | Walls, ceiling, floor, broadband absorbers, doors | High sound absorption; |
| Hydrophobicity; | ||
| Bioproof (mold, fungus); | ||
| Safe for health (with isolation). | ||
| 100mm acoustic foam | Walls, ceiling, broadband absorbers, door | High sound absorption; |
| Fairly cheap; | ||
| Easy to use; | ||
| Nontoxic. | ||
| Spanbond | Walls, ceiling, floor, broadband absorbers, doors | High particles & dust isolation capabilities; |
| Ventilated; | ||
| Nontoxic. |
The next couple of weeks I spent modelling, calculating and designing my studio.
I divided the overall process into the following steps, which I found efficient in my case...
| STEP | REASON |
|---|---|
| Back wall layers modeling | Critical due to the low ceiling and room location in the basement |
| Inner walls modeling | Largest absorption surface in the room, compensation for limited ceiling absorption |
| Ceiling & floor modeling | Balancing absorption capabilities to ensure acceptable room height |
| Calculating overall absorption coefficients | Forecasting room reverberation (RT60) |
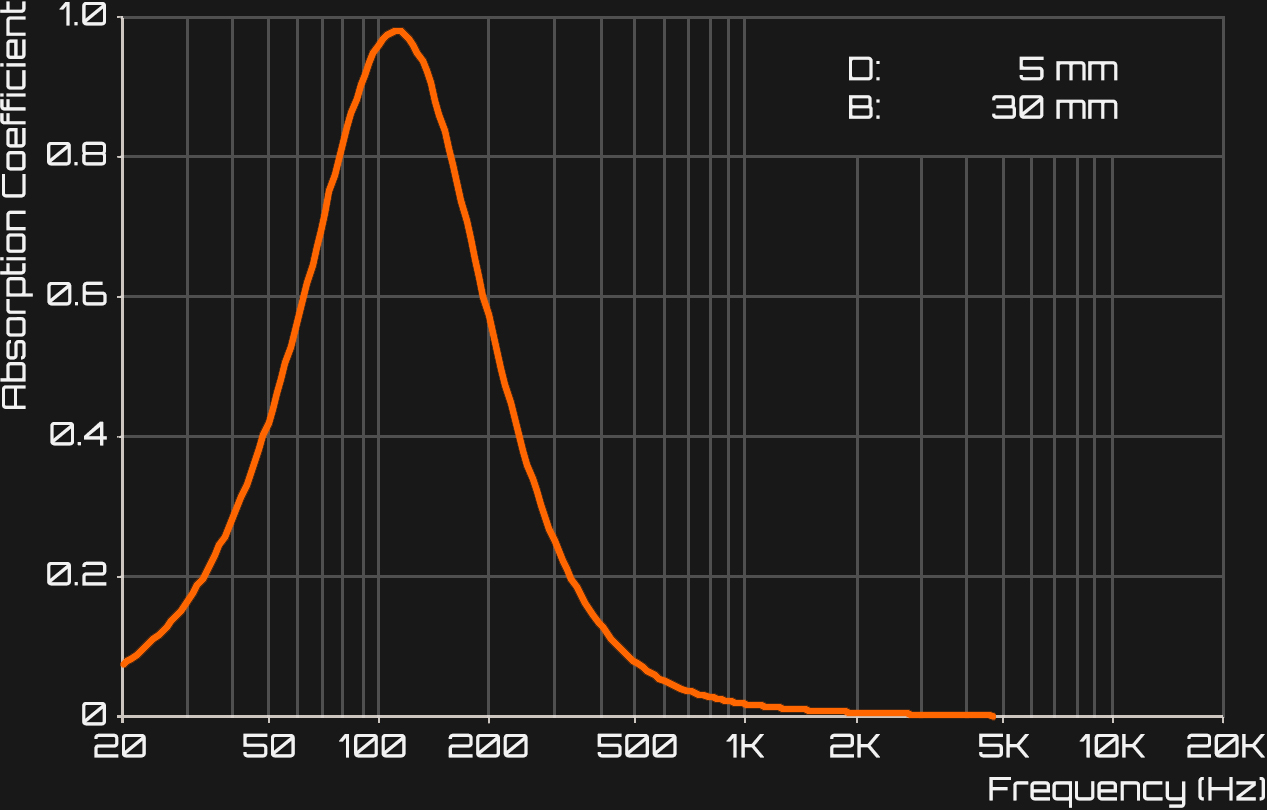
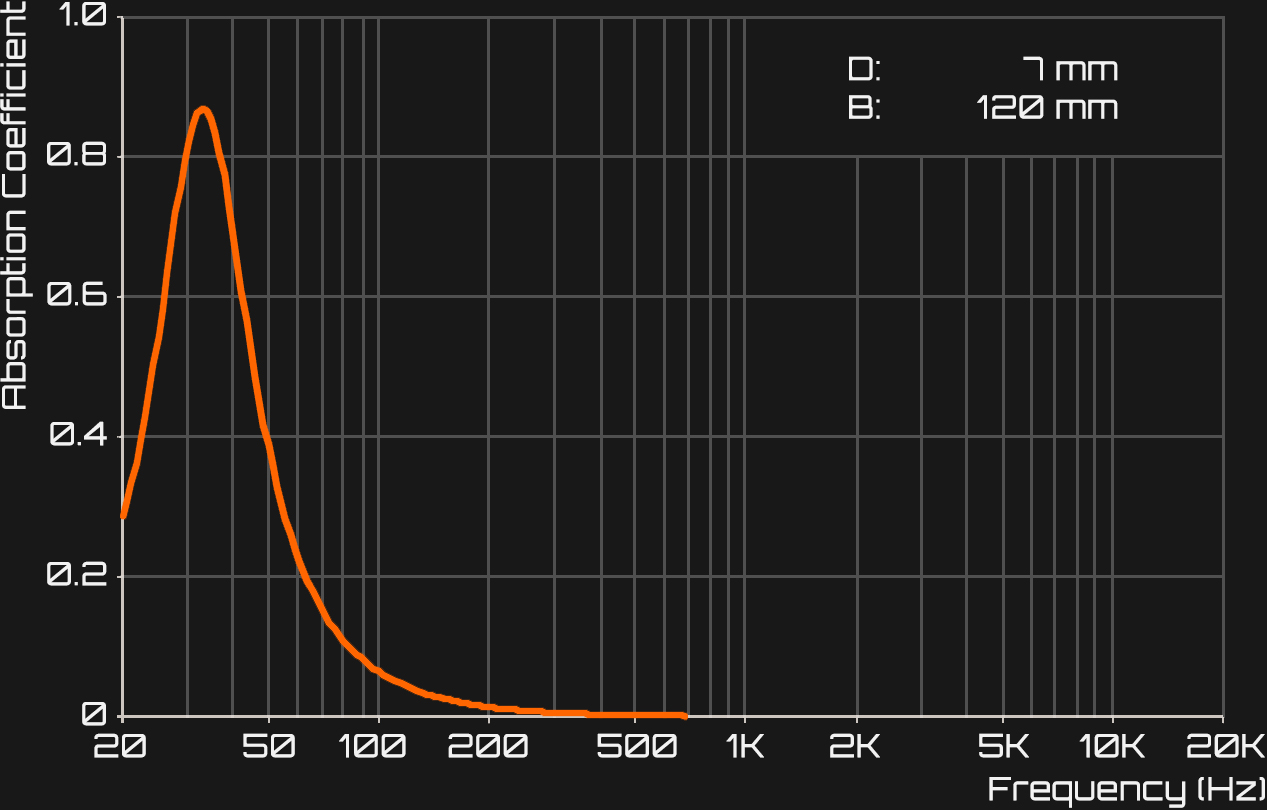
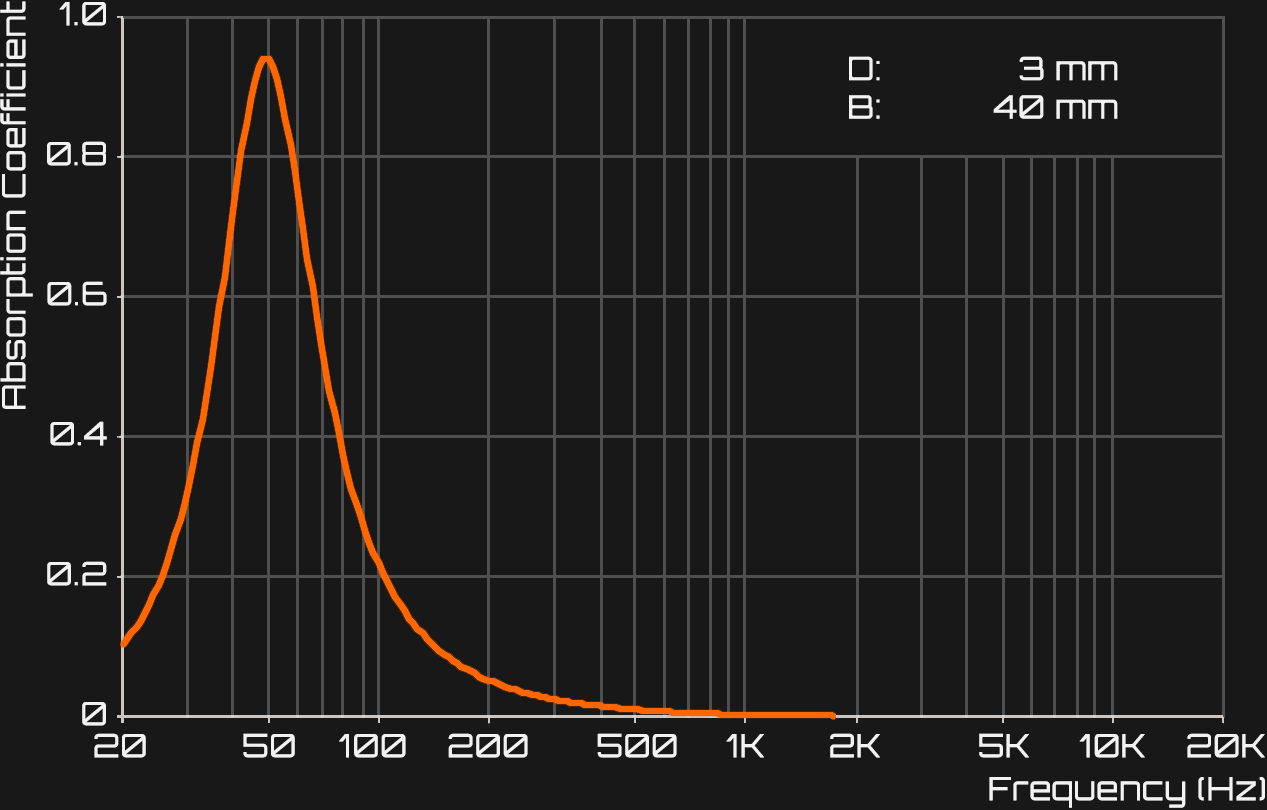
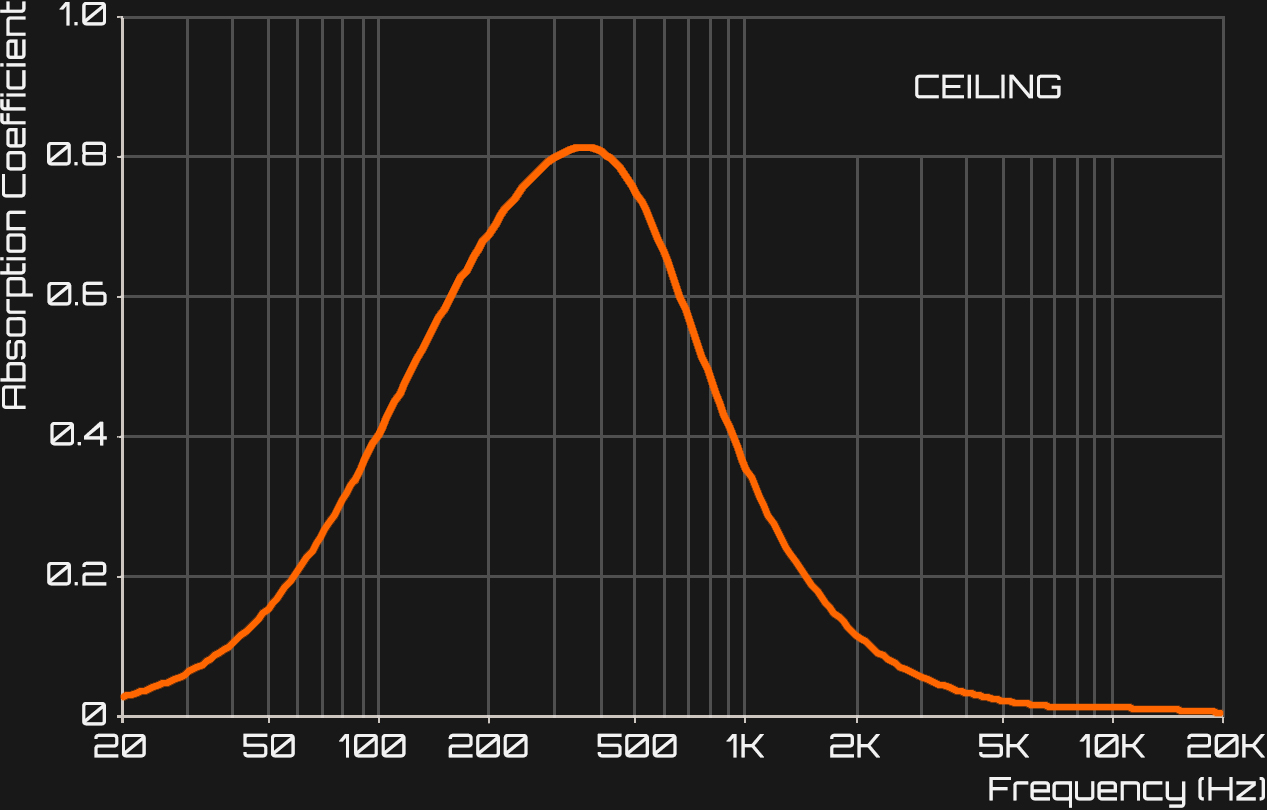
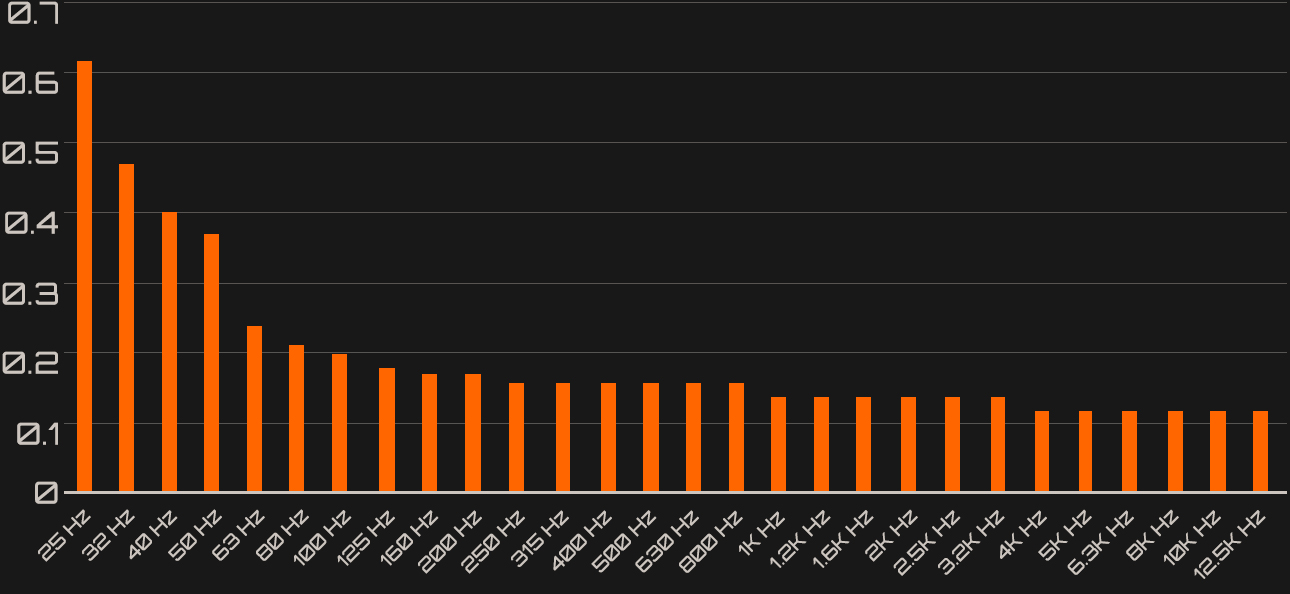
The Back Wall Bass Trap
The most critical element of the room was a huge multi-layer bass trap as the back wall which had the following absorption coefficient graphs.

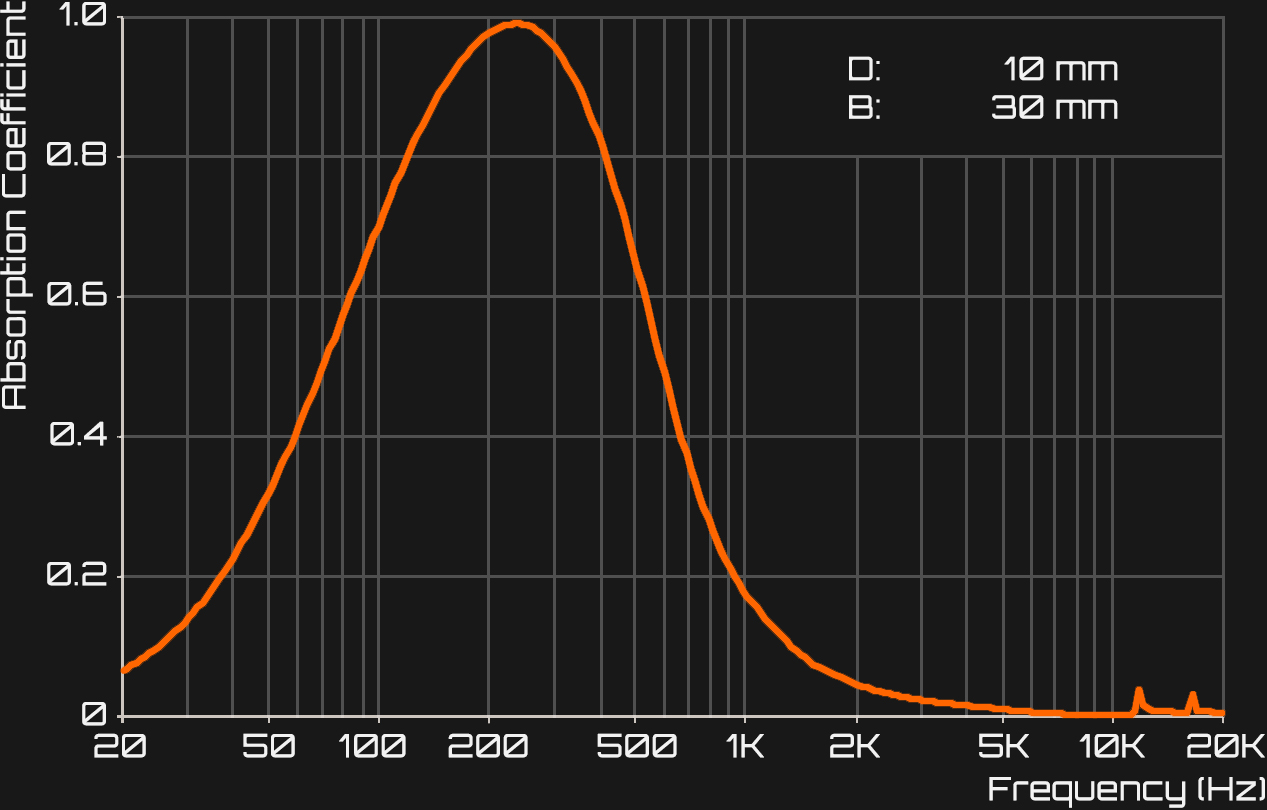
In order to make graphs make some sense, I'd like to explain what they show and how Helmholtz resonator worked in my way. As I saw it, every absorbing solution did something to waves of air so that they would lose their strength and wouldn't hit my ears more than once. The most massive waves are low-frequency waves, and they have a lot of energy inside them. That's why to move such massive chunks of air (to playback low frequency) I needed a very reliable PA system with big powerful speakers so small speakers were not an option for me. In a case of Helmholtz resonator - for me, it's a large sieve that sifts the air, and it loses it's energy when it comes back and forth through.

Diameter and Spacing
So changing the diameter and spacing of the holes and thickness of used materials (i.e. mineral wool, plywood, etc.) I chose what frequencies I wanted to neutralise. Available online-calculators provided me with a comfortable and enjoyable tool that freed me from new routine. The great book by Philip Newell covers the broad theory behind this physical process.
To increase the efficiency of my layered bass trap, I distributed the perforated plywood screens in descending order from the highest frequency range to the lowest. So, for example, a 32 Hz wave first comes through 250 Hz, 110 Hz and 50 Hz absorbers and loses some energy before it hits the 30 Hz perforated plywood panel.
The only weak point of this perforated plywood approach is that it needs a lot of spare space. But for a room with a low ceiling it was the only suitable option I could find. The point of the control room is that it has to have the same acoustic control through out the frequency spectrum and I think that this option is non-negotiable, there’s no possible compromise in my opinion. And after three years of listening music at a nearly 2-meter distance, I can honestly say that I don’t want any less.

As it was stated in many books, changes in the medium drastically affect the energy of the initial wave, it's durability, so it's like a video game where you don't use the same approach each time, you vary your hits, and you get a combo. The same goes here, one absorption type adds to another, then another and jointly it works more efficient than using each type solely. Unlike the complex multi-layer approach of the back wall, inner walls and ceiling were designed as a single layer combination of different types of absorption solutions. They were modelled appropriately to cover a broad frequency range.
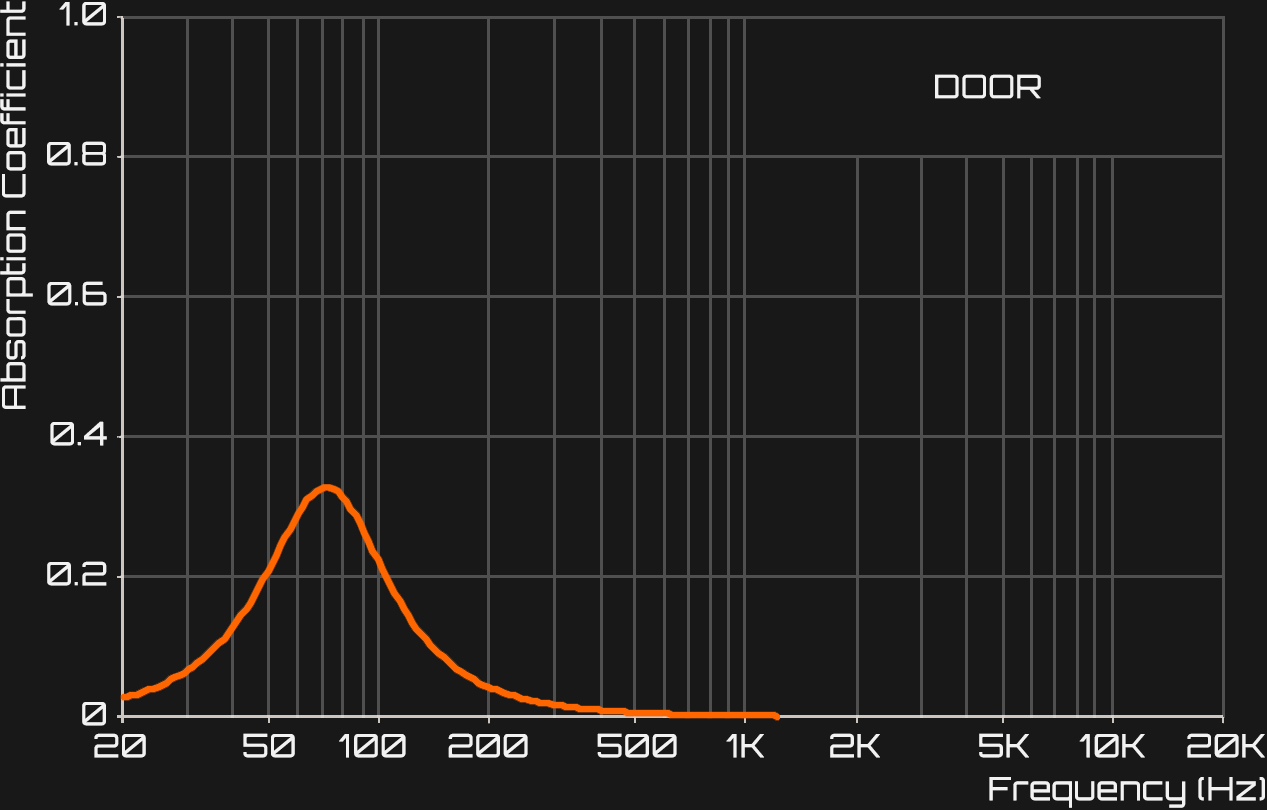
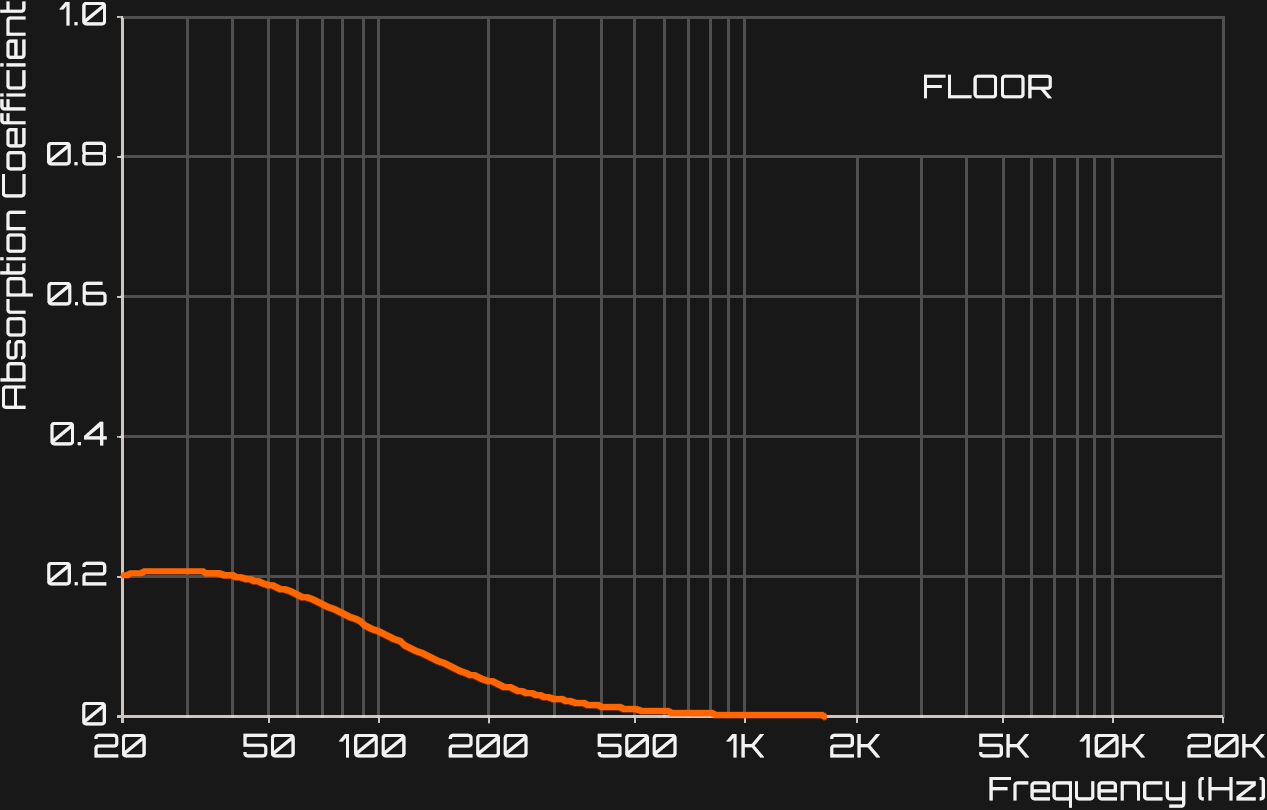
Floor, Ceiling And Doors Matter Too
Another essential part of the control room design was the floor and door absorption capabilities. For this job, I used my own Excel-calculator. Basically, I saw door and floor as membrane absorbers, and I wanted them to be a part in the low-frequency absorption process.
Low Frequency Absorption Is The Hardest
Low frequencies are the hardest to absorb so it was important for me to take care of them in the first place and my approach for the acoustic treatment was based on “the bigger, the better” principle. After every element was modelled, I calculated overall absorption capabilities of the room and created a reverberation forecast.
The point with RT60 is that it shows how much time it takes the room to soak up all those frequencies at one particular moment. The perfect option is when room absorbs all that frequencies with the same speed as they are generated. As I see it, reverberation time for low frequencies can be greater than mid and high frequencies as bass in songs doesn't usually play so fast that 0.6 seconds can smear its perception. But I'd like to have it equal all over the spectrum. After spending several years listening and analysing the low frequencies, I can honestly say that they play a vital role in music perception and to get things right it's important to have as much control as possible in that particular department. It takes some time to get used to reverberation time irregularity, but with a serious approach, it's not much of an option. Low frequencies do need an excellent treatment.
A Design To Work To
I was a little disappointed that I couldn’t achieve an even reverberation time in the low frequencies range or at least have them not so dramatically different from other frequencies. The next few days I spent exploring science-books, regulatory papers and social networks, finding out that it wasn’t so bad for a room with such dimensions. Realising that there were miracles and that was physics, I accepted my fate, and in a week, I created a simple technical project, which I used during the building process.
Click on the image for a larger version
Costings And Material Schedule
After that, I began calculating costs and the amount of material I would need to purchase which then were divided into delivery schedule blocks. That helped me to sustain the adequate financial freedom and reduce the need for loans because I was buying the necessary materials at the time I needed them.
As I had a job and got my salary twice a month my schedule included sufficient income and expenses, supply and installation work distribution. I took int consideration that ordering large amounts of materials like mineral wool or plywood would take some time to deliver so I ordered them slightly earlier than I needed them. Also, I left a time buffer in case I needed to change the supplier, or the order would not be supplied on the exact day. Another important thing is that I took some time to prepare the house logistics so the material could be stored without impacting everyone and yet would be available the moment I'd stretch my hand for it. The important thing that I understood was that when I pulled my money out of the pocket, it was a point of no return. It was the moment when I had confidence in my preparations. Also, it was a point when a dream started to become a reality.
Part 2
In the next part, we look at the structure, the detail design and implementation of the floor, ceiling, interior walls, and the layered back wall.