How To Change The Fan In Your AVID 192, 92 or HD I/O

We have talked a great deal of late about reducing the background noise in our own studios. To that end I decided to take on 3 of the loudest units in my studio, my Avid HD I/O, my 192 and 96 I/O.
Warning
Words of warning. If you are not happy using tools or getting up close and personal with cables and the like do not start this project. Also if your units are new and still under warranty opening them up and messing with the power supply will make these warranties null and void. You have been warned. The plus side is that doing this will get rid of some of that frustrating background noise. The results are amazing.

I used only 4 tools for this job. A small and micro sized Philips screw driver. A small pair of pliers and a small blunt tipped tool. These are available in most PC tools kits.

Taking Apart The Interface
First remove the 15-20 small black screws that secure the top part of the case. It is a good idea to keep these in a small pot as they do have a habit of rolling away. With all of these removed the lid can be lifted away.

Then remove the 3 black screws that hold the screen of the PSU to the outside case. These screws are the same size as the lid screws.

Moving to the inside of the unit, undo the 3 silver screws that hold the other side of the PSU screen. This will allow the PSU screen to be lifted away. Care should be taken as with 192 and 96 units the screen has items of the PSU mounted to it so do not pull this completely away from the rest of the unit.

You can see here the lid or screen of the PSU lifted up.

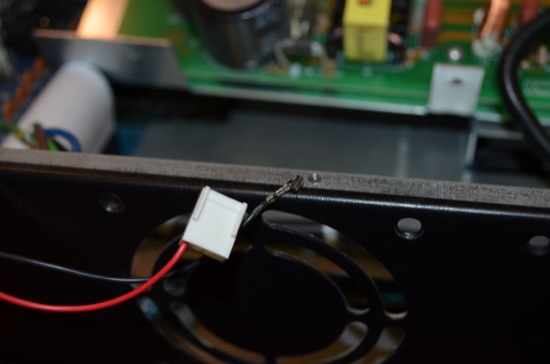
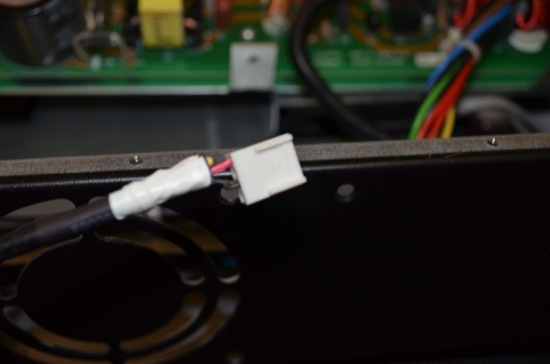
What you can see here is the connection the fan makes to the PSU. This is the connector with the Black and Red cables. On the HDI/O the connector is mounted to the front panel but it is easy to fine. Unclip this and gently ease the cables and clip out of the unit. Take care not to be to rough with this.

Now undo the 4 screws that hold the fan in place and gently lift the fan out of the unit. Keep this fan as you need to remove the clip from the back and red cables. Grip the black cable close to the clip with the small pliers then pull firmly and evenly to remove the cable from the clip. It should keep the grip on the end so you can use the clip with the NEW fan. See below.
Repeat this for the red cable.
Installing The New Fan
I chose a Noctua fan to replace the old one. These are available from many of the normal online hi tech outlets.
This unit is an NF-R8 which is great for low acoustic noise and is rated at 1.32W, .11A and runs between 3 and 13V. Perfect.

The slightly annoying thing about this fan is that it uses a different connector to the Avid interfaces. So again being forcefully gentle pull the cables from the new clip and put the new fans cables in the old clip making sure you note which of the 4 holes on the clip should be red and black. The new fan also has a yellow cable (for reverse, which we don’t need) so this can be taped away to keep it tidy.
Now reconnect the NEW fan. re-route the cables around the other parts of the PSU (this is different for each of the I/O unit) and reverse the process of taking the unit apart to put it back together.
Final Reassembly And Testing
You may notice that the small black screw that holds the lid of the unit down above the fan cause the fan to stop. This is because the screw pushes into the fan housing. I have simply left this screw out as I figure that 15 screws should be enough.

You can now put your studio back together and enjoy new levels of quiet in your work space. Enjoy.