Pro Tools Fundamentals - Using Track Names and Colours
There are several features of Pro Tools which can help you distinguish between the different elements of your session. Track order is one of the most obvious and while there are no rules there are some broadly held conventions about where tracks go in a session. I’ll only talk about music sessions here but I’m sure similar conventions exist in post.
Track Order
I always try to follow the same track order in a typical tracking session and when I teach, I encourage my students to do the same. My track order is my version of common practice in live sound. I’m sure they will be familiar to many and when tracks present themselves which don’t have an obvious place in my preferred order I’ll make a best guess on where feels right. Ultimately it doesn’t really matter how you do this as long as you do it consistently but there are some conventions which seem to be so widespread that it seems counterproductive to ignore them.
The tracks go from left to right in the mix window. In Pro Tools the left to right mix window order is mirrored as top to bottom in the edit window so the leftmost track in the mix window will be the top track in the edit window.
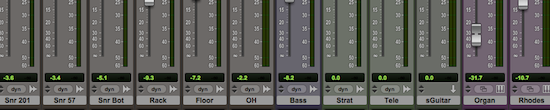
In my sessions, for a typical band session, tracks go:
Drums, percussion, bass, guitars, acoustic instruments, keys, vocals, BVs, masters, returns.
The drums would be arranged kick, snare, hat, toms high to low, overheads, room mics etc. Electric guitars including bass would be grouped together, always with a DI first, followed by mics. If there are multiple mics on an amplifier I’ll put them in order with increasing distance from on axis and on centre. That is getting really fussy but I see the point of this as being having a rationale and interpreting it in the most appropriate way for the tracks you are placing in your session. If I understand the rationale then I know where a track should be so I don’t need to remember where it is because I already know where it belongs.
People are of course free to organise their sessions in any way they see fit and it is easy to rearrange track order in sessions but I still encourage people to follow these conventions. These are not rules but they are definitely common practice. The detail might vary but I think its fair to generalise that most people anticipate seeing a kick drum on channel 1 of the mix window.
Use Of Track Colour

The other really easy way to differentiate between tracks is to use colour. I’m not aware of any particular conventions in the use of colour in sessions. I think its fair to say that it doesn’t matter how you use colour as long as you use it consistently across your sessions. I have some loose conventions I follow in a typical music session. Colours will usually follow this pattern, I’ve included the reason I chose that colour, as you can see they are mostly lighthearted but as long as it helps me remember which is which it doesn’t really matter why I chose the colour I did.
- Drums - Brown (because drums are made of wood)
- Percussion - A different brown (because they are like drums)
- Bass - Deep Blue (because bass starts with a B and bass is deep)
- Guitars - Green, but not the default Aux input green (because of the G, no other reason)
- Brass - Yellow (Because brass is yellow)
- Keys - Purple (because keys can make weird noises and I associate purple with weird)
- Lead Vox - Shocking pink (originally as a joke but its a really bright colour and stands out)
- BVs - Light red (bit like pink)
Masters, returns and VCAs are all left their default colours but I tend to change Instrument tracks as they look like drum tracks if left brown.
The above is an example but a neat session with a logical ordering of tracks and clear use of colour is much easier to work with and if you ever exchange sessions with collaborators all of these things make life immeasurably easier if you are receiving someone else’s session. I’d count naming all busses as a basic courtesey if you are sharing sessions but even if you aren’t, if you name your busses you don’t need to remember that your plate reverb is on buss 5&6. To rename a buss just right click on it in the IO section of the mix window. The less time it takes to understand the session the sooner you can start useful work on that session.
Naming Conventions
Although Pro Tools shortens long track names in a semi-intelligent way, the shortest possible name is usually the best. Always name your audio tracks before recording to them, as the clips and their parent files in your audio files folder will derive their names from the track name. If you leave it as “Audio 1” you will end up with files and clips called “Audio 1_01.wav” etc. Far better to name before you record.
Naming For Control Surfaces
As I frequently mix on control surfaces I have adopted a system I first came across on an Avid tutorial video where subgroups are prefixed with an “s”, VCAs with a “v”, effect returns with an “x” so a guitar VCA would be named “vGuitar”, a drum subgroup would be named “sDrums” and a hall reverb return would be called “xHall”. This convention doesn’t make much difference on screen where colour helps identify the track but on an Icon it really helps. I realise that as a fundamentals article talking about Icon workflows is probably inappropriate but this is included to illustrate the point that your approach to managing your session depends on who you are and what you do. Some things like track order I would recommend for everyone but exactly how far you take it depends on how big your sessions are and whether you regularly work with others.